We can all agree that we love the Weasleys. From Molly’s motherly nature, to the havoc the twins cause, to Arthur’s strange muggle fascination and to brothers Bill and Charlie whom we don’t hear much about, everything about them is wonderful and magical. And their home… Oh I just love the location clock in the kitchen and the self-washing dishes.
Today’s post is dedicated to the Weasleys; a collection of their wands that you can give out at HP themed parties in case someone forgets theirs, or just keep for yourself and wear different Halloween costumes to match 🙂

What you need:
- 8 chopsticks
- A few sheets of A4 paper
- Acrylic Paints – Black, Barn Red, Golden Brown, Espresso,
- Metallics: Bronze, Silver Grey, Brass, Dark Gold
- Hot Glue
- Toothpicks
What you do:
Firstly, look up images of all 9 wands for each member of the family – Arthur, Molly, Bill, Charlie, Percy, Fred & George, Ron and Ginny (9 in all). The basics of wand making can be learnt in one of my earlier posts which I used for some of the wands (Link: DIY Wand)
- I started off with Arthur, Molly, Percy and Ginny wands because they are the easiest and quickest. You will need 4 chopsticks and 4 sheets of paper. Wrap the sheets around the sticks as in the DIY mentioned above.
- Once that is ready, use the hot glue to create the same swirls for Arthur / Percy and lines for Molly and Ginny (use the template as a reference).If you make a mistake, you can always peel off the glue once it dries and start again. The Ginny one was a little more intricate; see image below for a clearer idea.


- Paint Arthur, Molly and Percy wands gold. Use the Bronze to accent the lines lightly for a more shaded look.


- Paint the Ginny wand black and use silver grey for the accents.

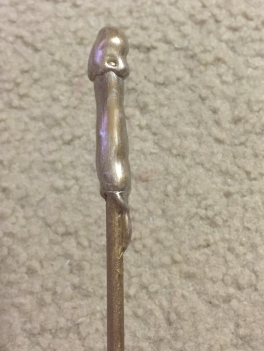
- I used chopsticks without the paper for the remaining coz I ran out of paper 😦 For Bill’s wand, paint the stick espresso and dry. Use the glue to make a dome shaped structure with swirls and indents on the top of the wand, as per the template and dry. Paint it espresso, dry and add a light coat of silver grey.

- For Charlie’s wand (which is basically Ron’s 1st wand that broke), paint the stick golden brown and let dry. Add one thin line on top and 2 thin lines 2.5 inches from the top and dry. Paint the lines with the espresso.

- Fred’s is a little trickier. His wand has rows of notches and protrusions. Use the hot glue to create a dot and use the toothpick to spread out the dot to create thin lines. After the line dries, cut the swirl near the tip and bend it upward (like a rose thorn). Do this for 9-10 rows and let dry.
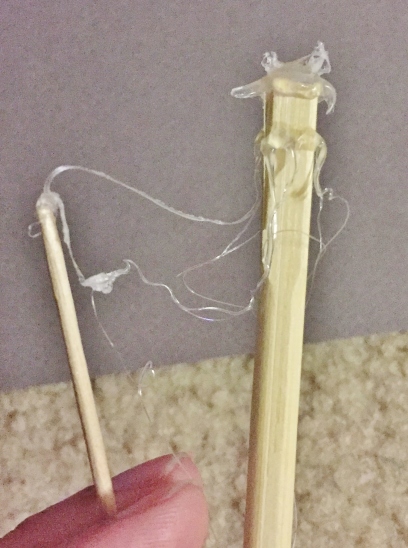
- Add 3 more little thorns below the last row in a staggered fashion (see image for further clarification). Paint everything espresso and dry.

- For George’s, cover the top 4 inches of the stick with paper and glue to together to form a dome shaped cover. Use hot glue to add thick swirls right below the paper, as in the template, and let dry. Add thinner swirls below the thick ones and dry. Paint the entire wand gold. Paint the thick swirls with the red and the thin ones black. Let dry.

- Use a thin brush to paint zigzag lines in red on the paper covered section and let dry.

- Ron’s wand, his new one, is similar to Bill’s. Use the glue gun to create the design as in the template and paint the entire thing espresso. Cover the top dome shape in a light coat of silver grey.
I painted the names of the wand holders on the side at the bottom, so I wouldn’t get confused. Place the wands in a jar to hand out. You can do the same for Death-eaters, Dumbledore’s Army, Triwizard contestants etc. Have fun 🙂

Thanks for the information.
LikeLike
Ill remember this if I ever need one.
LikeLiked by 1 person
Can you do one for Hermoine’s one, pretty please?
I really enjoyed this DIY though. Definitely going to try doing Ginny’s
LikeLiked by 1 person
Yup def will 🙂 Stay tuned for it.
LikeLiked by 1 person
FYI I’m working on the Hermione wand as you requested. Will have ot ready by next week 😀
LikeLiked by 1 person
That’s awesome!! Thank you😌
LikeLiked by 1 person
Love these! Made some of my own for my Harry Potter Party. You can read all about it here: https://theblisslist.ca/2017/07/21/harry-potter-party-with-free-printables/
LikeLike
Loved it. Moaning myrtle on the toilet was hilarious 😀
LikeLiked by 1 person
This is so creative and I love how you used the glue to create designs! Well done! 🙂
LikeLiked by 2 people
Thank you 🙂
LikeLike
These are awesome. I love some Harry Potter
LikeLiked by 1 person
Thanks 🙂 I do have more coming up so stay tuned 🙂
LikeLike
As a fan of Harry Potter, this is a great DIY project! Thanks for sharing. ⚡️
LikeLiked by 1 person
I’m glad 🙂 Stay tuned for more HP DIYs.
LikeLiked by 1 person
Amazing! ✨✨
LikeLiked by 1 person
Wow! I love this! This is sooo creative! They look so perfect!
LikeLike
Thank you 😀
LikeLiked by 1 person
Wow 😳 this is amazing 🙂 I’m going to have so much fun come this Halloween 👻 I have a 3 year old daughter who thinks she’s going to be rapunzel lol she’ll be Hermoine 🤣🤣😇💕
LikeLike
Glad you like it 😀
LikeLiked by 1 person
Oh my gosh, I absolutely love Fred’s. It’s totally cool… I never thought to use chopstick either. Totally original
LikeLike
Thanks 🙂 You def should make some.
LikeLike